Talos Linux
Archived
This page has been archived and kept for reference. Some of the links on this page may no longer work.
In my Homelab I have a single Talos Linux node which runs various Kubernetes workloads.
What is Talos Linux?
Talos Linux is a Kubernetes optimized Linux distro.
It’s designed to be as minimal as possible while still maintaining practicality. For these reasons, Talos has a number of features unique to it:
- API managed
- Immutable file system
- Minimal packages
- Secure by default
Talhelper & Machine Configuration
Talos Linux's node state is defined by a machine configuration. Machine configuration is applied to the node during initial deployment. The talhelper CLI tool generates the machine configuration declaratively from three files:
| File Name | Description |
|---|---|
talconfig.yaml |
Primary configuration file used to generate the machine configuration. |
talenv.sops.yaml |
Stores environment variables which are templated using envsubst into the machine configuration. |
talsecret.sops.yaml |
Stores secrets used by Talos. |
Prerequisites
-
Install the required CLI tools to manage Talos:
-
Configure
sops:Info
-
Configure
sopsfortalhelperby adding the age public key to thekubernetes/.sops.yamlfile:
Talos ISO
ISO image I used when originally deploying my Talos node.
Deploy the Talos ISO on Proxmox
-
Download the ISO to the Node 1
localstorage. -
Navigate to
proxmox01>Create VM. -
Provide the following details for
Generaland click Next:Setting Value Name talos01ID 100 Node proxmox01Start at boot ❌ -
Under
OS, select the storage where the ISO was downloaded to and choose themetal-amd64.iso. Click Next. -
Under
System, select theVirtIO SCSI Singlecontroller andQemu Agentand click Next. -
Provide the following details for
Disksand click Next:Setting Value Bus/Device SCSIStorage lv-ssd-crucialSize 100GiBFormat Raw disk image (raw)Discard ✅ SSD Emulation ✅ IO thread ✅ Backup ✅ Setting Value Bus/Device SCSIStorage lv-ssd-crucialSize 200GiBFormat Raw disk image (raw)Discard ✅ SSD Emulation ✅ IO thread ✅ Backup ✅ -
Provide the following details for
CPUand click Next:Setting Value Cores 4Type host -
Provide the following details for
Memoryand click Next:Setting Value Memory (MiB) 4096Ballooning Device ✅ Minimum Memory 4096 -
Leave
Networkas default, click Next and confirm deployment. -
Start the
talos01VM and open the console to begin the installation. -
In the console, press E to edit the grub menu option and add the end of the kernel boot options enter:
-
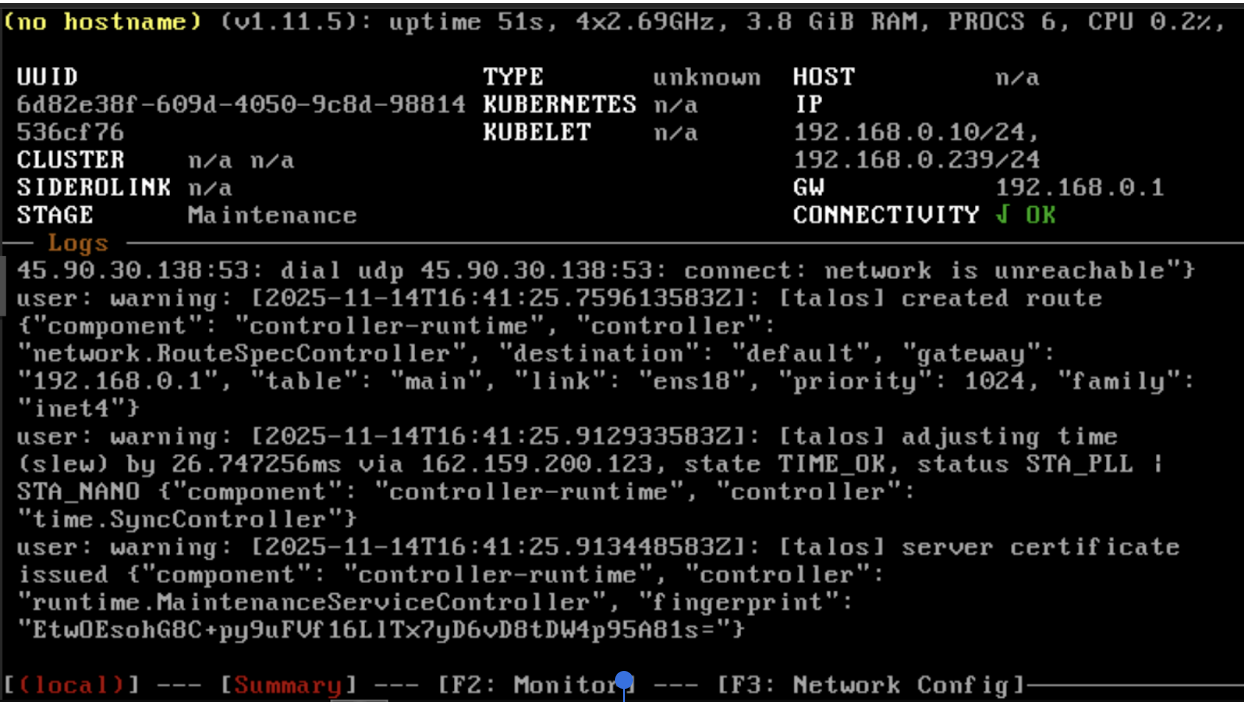
Press CTRL + X to boot.
Talos will now have booted into maintenance mode and is waiting for machine configuration to be applied. It should look like the screenshot below:
Deploying Talos
Generating and applying the Machine Configuration
Info
These steps only need to be performed during the initial set up of Talos and assume you've already created the talconfig.yaml, talenv.sops.yaml and .sops.yaml files.
cd kubernetes/talos
talhelper gensecret > talsecret.sops.yaml
sops -e -i talsecret.sops.yaml
sops -e -i talenv.sops.yaml
talhelper genconfig
talosctl apply-config --talosconfig=./clusterconfig/talosconfig --nodes=192.168.0.10 --file=./clusterconfig/home-ops-talos01.yaml --insecure
Bootstrap Talos
-
Bootstrap etcd:
-
Retrieve the
kubeconfig:
Once the machine configuration has finished applying and etcd has finished set up the node should show as below:
